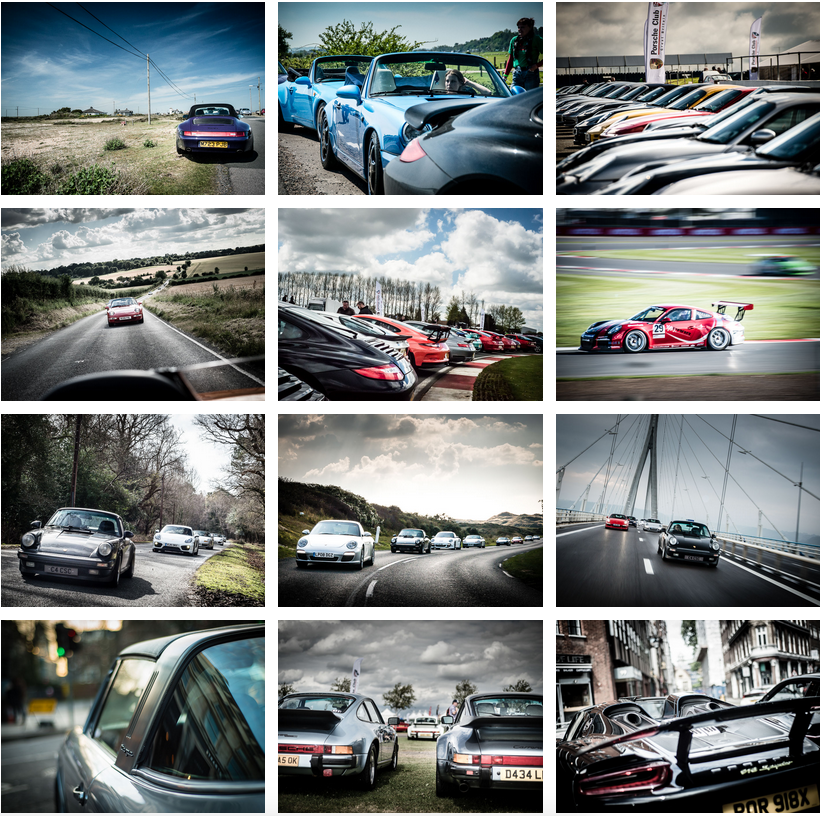
It is here! A free online course that walks you through the tips and tricks. If you prefer to learn by watching and doing. Head over to How to improve your car photography and learn some new things.
Nick (my better half) and I are Porsche enthusiasts and since 2010 have been taking pictures of cars at hundreds of Porsche Club GB meets, drives and events, especially in London. Along the way we have learned a thing or two. Our pictures make it onto our Club website, facebook, instagram and twitter, as well as in the Club magazine; Porsche Post.
We often get asked questions about how to photograph cars. These are the simple principles that we apply.
Four things make a significant difference to the pictures we take;
Have a camera with you, any camera
Get the composition right
Change your angle
Look for patterns
Have a camera with you, any camera
A great piece of advice, given to us by Jaydie Putterman when we spent the day shooting in London with him; 'The best camera is the one you have in your hand, not the one that is sitting at home’. Most of our shots are taken on a Nikon D800 with a variety of lenses, 50mm prime, wide angle, polarising filters etc. Fancy, but these days a smartphone often takes better pictures, and is my #1 recommendation when asked at meets. Especially where it is low light, or night shots at Ace Cafe - the guy with the smartphone next to me is getting better pictures, better balanced and better lit than my camera.
Use whatever is in your hand and apply the next three things.
The best camera you have is the one in your hand
Advanced Tip: We often take driving shots. Simple to do. You need a passenger, with a camera. We have ours on a wrist strap and hold on tight as we hold the camera out the window - no further than the wing mirror. The last thing we want is a camera-sized dent in our bodywork. Set to an 'action' setting if you have it, and shoot away.
You will take shots of the sky, hedge, road, fence, anything but the car behind you. Go with it and don't be disheartened, it is digital and you can delete later. Look in the wing mirror at what is happening behind you. We are fussy; no other cars except Porsches, ideally a line of cars sweeping behind us, a sense of the countryside and the drive we are on.
Shoot while driving
Get the composition right
The best thing you can do, to improve your pictures, is to pay a bit of attention to your composition, in non-technical language; the picture you are taking. There is a very simple trick which gets you started. The rule of thirds.
This is what is pleasing to the eye. Imagine a noughts and crosses grid drawn over the picture you want to take. Rather than placing the image front and centre, place what you want to take a picture of along one of the lines, or on one of the crosses.
Rule of thirds
A simple trick that makes all the difference. Immediately your pictures look better. Try different combinations, a row of cars along the bottom line, with more sky, or cars along the top line with more foreground ahead of them. Embrace 'negative' space and don't feel that you have to fill the entire picture with the car(s).
Advanced Tip: Have your subject swerve along the lines, or bend around them, in an 'S' or a 'C' shape. We often choose these compositions for our driving shots.
Change your angle
Most of us start taking pictures by holding the camera up to our face and pressing the button. Which gives just one dimension to your picture. Try varying the angle; get level with the car, or get down very low, which gives a different perspective. Or go high, and take a shot from above. Powerful, and different. I can often be found at floor level 'in the dirt'.
Step back, or get up really close for even more drama
Advanced Tip: A great way to hide things you don't want to see. We use this regularly to hide non-Porsche vehicles, road signs, or street furniture. It is a great way to avoid the picture being dominated by the painted parking lines too. If it has been raining, look for the reflections in the puddles.
Look for patterns
A great picture isn't just about having a single car front and centre. Our brains like patterns too, whether it is the columns of a building, or the bonnets of a row of Porsches. It draws our eye into the picture. We also like recognisable parts of cars, they are familiar.
Repeated Patterns
Recognisable shapes work well too, the rear quarter of a Porsche is highly recognisable to those that love Porsches.
Recognisable shapes
And a bonus item ....
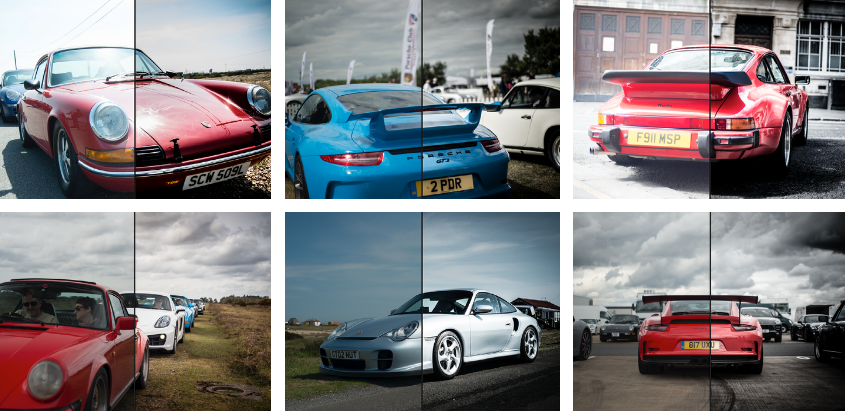
The thing all great photographers do. Post production. We add filters or pass our pictures through some sort of editing software to correct the things we could not fix at the time. Each photographer has a 'style' that they have developed. Ours has evolved over the years, and still does.
You can edit in a free app on your smartphone, one that costs a few pounds/dollars (such as Camerabag), or Adobe Lightroom. A chance to correct your white balance, exposure, or add some definition. This is where a 'snap' becomes a 'picture'. Choose a photographer you like, see what they use or search the internet for free filters.
The post production version, with greater depth of colour and contrast
Event photographs are posted on our Club website galleries, facebook, instagram and twitter within an hour of getting home. We choose just 12 pictures to represent each event from a total of 80-400 taken. Which means minimal adjustment to each image in Adobe Lightroom.
Lightroom Desktop
Firstly, is the picture in focus? You can't recover one that isn't. Then for us it is about the story; we like to have just Porsches in our pictures, plus some context - whether that is the backdrop of Ace Cafe, the rolling countryside on our driving shots, or the London architecture. A balanced sense of the event.
Before and after
Advanced Tip: The settings we use in Adobe Lightroom; we punch up the clarity to 50-65 (to add an edgy 'reportage' feel), add an ND filter to the sky (for those 'Top Gear' dramatic skies'), adjust the white balance in artificial lighting, using the dropper tool on a neutral white/grey - front number plates are good for this and finally adjust the exposure, either overall, or in sections. Three clicks and we are all done.
Ultimately; take pictures. Try new things, enjoy what you see.


